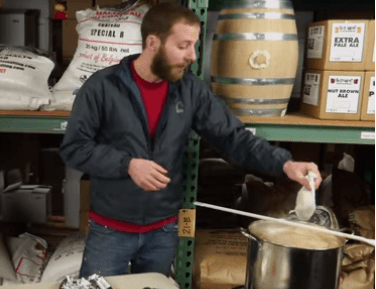
Until recently, making beer at home was a niche occupation practiced by just a few devotees mostly working in isolation for their own enjoyment. These days, however, homebrewing has exploded in popularity and is on the verge of becoming a (gulp!) mainstream activity.
Get the ingredients, get the equipment, and let’s get brewing!
Below we take an in-depth look at how to make beer at home. We’ll explain the different types of brewing, go over the things you’ll need to make your own beer and take you on a step by step journey “from hops to bottle tops.”
 Here is a summary on how to brew your own beer:
- Boil 5 gallons of water to 170 degrees Fahrenheit
- Add your specialty grains and let it soak for 30 minutes between 160-170F.
- Add malted extract and aroma hops to the solution and bring it to a boil for 90 minutes.
- Cool the mixture with a wort chiller.
- Transfer the cooled wort to the fermenter.
- Activate and pitch yeast. Ferment at 68F to 70F.
- Wait 1-2 weeks as the yeast ferments the sugars to release CO2 and ethyl alcohol.
- After the main fermentation process, add your priming sugar for carbonation.
- Keg or bottle your beer.
Looks easy, right? Once you’ve gotten all these steps down, you’ll see how easy it gets on each subsequent batch. Consistency (and practice) drives quality in the craft!
Intro to Beers (Different Styles of Brews)
If you want to be good at home beer brewing, you need some basic context on beer first; you need to understand the fundamentals of what makes a beer beer. To get educated on that, check out this list of different types of brew. This will allow you to know how to pick recipes, what the simplest styles to make are, etc.
What Ingredients are in Beer?
 What is beer made of? This is one of the most commonly asked questions aspiring home brewers have and thankfully it’s one with a nice simple answer.
There are 4 main ingredients in beer: hops, grains or malt extract (depending on which method you’re using), yeast and water.
The role of the different ingredients is:
- Water – Without water, beer (or any beverage for that matter) would be impossible. Because more than 95% of your final product will be water, the quality of the water you use will have a big impact on the quality of the final product. Keep that in mind!
- Yeast – Yeast is that which turns your sweet brown “tea” into beer. Yeast is a single cell organism that eats sugar and converts it into alcohol and CO2. This is called fermentation.
- Grains – Barley is probably the most common type of grain used today although there are plenty of beers out there that use wheat, corn, and even sorghum or rice. If you’re using the All Grain method, you’ll be purchasing barley in its whole form. If you’re using the extract method, you’ll be purchasing barley malt, which is a soup of sugar and soluble starches that’s ready for fermentation.
- Hops – Hops are those things that give your DIY beer its flavor and aroma. They also work to counteract the sweetness left over from the fermentation process and act as a bacterial inhibitor. There are many kinds of hops and different ones produce different flavors.
Different Fermentation of Beer: Lagers vs Ales & Hybrids

All beers are either lagers or ales, and it is determined by the type of yeast used to brew it.
- Lagers are made with yeast that ferments at the bottom of the mixture;
- Ales are made with yeast that ferments at the top;
- Wild and Sour Ales are brewed with spontaneously fermenting yeasts which gives them their distinct qualities
With these 3 fermentation methods, the base is determined;
but beyond that, your brew will still have very unique and tremendously complex characteristics!
So even if you are brewing beers that are of a similar style, the qualities may be similar, but the taste, aroma and consistency will vary.
You can dive deeper into each fermentation method here: Lagers vs Ales
2 Brewing Methods: All Grain or Extract Brewing?
 Before learning how to make beer at home, you need to decide which type of brewing you want to engage in.
Essentially there are two types available to the homebrewer: all grain and extract.
In the step by step homebrewing guide on how to make your own beer, we’ll be explaining the extract process, but it’s good to know a bit about both so you can make up your own mind which one is more to your liking.
All Grain Brewing – All grain brewing entails extracting sugars from the grain through a method known as mashing. This is necessary in order to convert the starches in the grain into fermentable sugars.
Mashing grains is not like mashing potatoes so don’t go reaching for the potato masher here. Instead, mashing in this case means soaking the grain in cold water to release the starches and allow the enzymes within the grain to break down into the aforementioned fermentable sugars.
Once this is complete, the resulting sugars are then rinsed from the grains through another process called sparging.
Once the fermentable sugars have been extracted from the grain, the rest of the process is the same as that of extract brewing, which we’ll go over now.
Extract Brewing – With this method, you are able to skip the mashing step because someone else has already done it for you. They then packaged the results in the form of a liquid or dry malt extract which, along with other things you’ll need, comprise a kit you buy to kick-start the whole brew process.
While there’s no doubt that brewing your own beer with malt is going to cost you more many people opt for this method because of the time and effort they’re able to save.
“Compared to partial-mash or all-grain brewing, extract brewing limits the unique malt-derived flavors in your beer. One way to overcome this limitation is by adding speciality grains (also called ) into your wort.”
– Brew Cabin
Make sure to read through ALL the steps before you begin brewing!
Anyone can successfully brew at home, but there are a number of things that can go wrong. Problems can range from yeast failing to ferment fully to foul, rotten-egg-smelling brew.
So read through the steps and understand them to minimize the risk of disaster.
How to Brew Beer at Home: What You Will Need
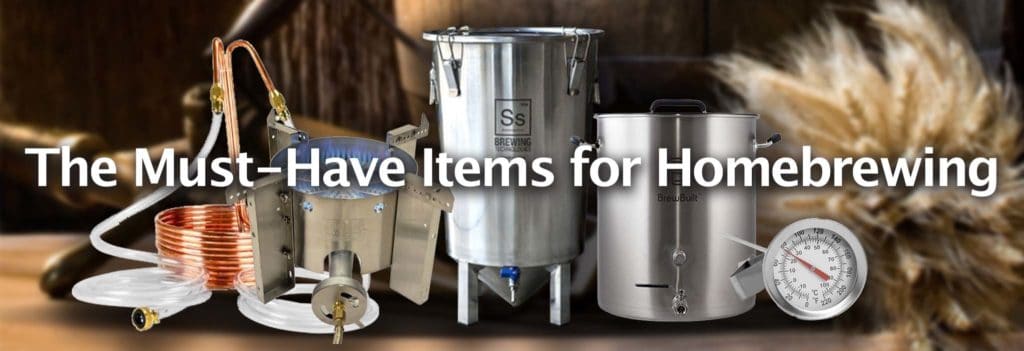
Equipment
Nobody today brews quality DIY beer without the right equipment. So here’s a list of the essentials you’ll need to set up your home brewery.
Here is a list of the equipment you will need:
- Fermenter – During the fermentation stage your soon-to-be beer is known as wort and you’ll need a large vessel to hold the wort as it ferments.
- Airlock – Because the top of your fermenter is going to be securely closed, you need some way to vent the carbon dioxide that the fermentation process produces. This is what the airlock is for.
- Brew Kettle – The whole boiling method takes place in the kettle. For an absolute beginner making a limited amount of home brew, a 1.5 gallon kettle may suffice. Although there’s no harm getting a larger one so you’re prepared when the time comes to ramp things up a bit.
- Burner – If you’re going to make beer, you’ll need a heat source that’s strong enough to bring 1 or 5 or however many gallons of brew you’re making to a boil in a timely fashion. For small batches, the stovetop may work. But for big batches, we recommend a 72,000 BTU burner.
-
Siphon with Tubing – Siphoning your wort or finished product from one vessel to another is the way to go as other methods have the potential for disaster built into them. Try to find an auto-siphon that will create the necessary vacuum for you.

- Cleaner – Keeping things nice and clean is as essential with homebrew as it is with cooking. You wouldn’t make yourself dinner using dirty cutlery, dirty pans and dirty dishes. Same goes for brewing. Try to avoid scented cleaners though.
- Sanitizer – Sanitizing is a separate step that’s done in addition to cleaning. Sanitizers kill off any pain in the neck microorganisms that could wreak havoc with your brew (and your gut). Be sure to follow the instructions to the letter.
- Hydrometer – You use a hydrometer to measure the sugar density of the wort. Once you know how to brew beer, you can get by without a hydrometer, but you’ll likely wind up using one anyway for more precise control over the fermentation process. You can use a refractometer as a substitute.
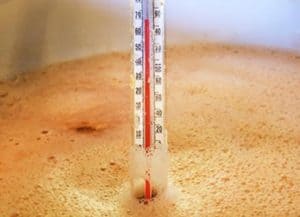
- Thermometer – They’re cheap, and this equipment helps to have one on hand to monitor the temperature of the water during the early phase of the brew process.
- Wort Chiller (counterflow or plate chiller) – Experts say that a chiller is the best equipment to use when cooling down the wort.
That’s pretty much all you need to be able to successfully brew your own beer. Check out this home brewing supplies page for a more comprehensive list of equipment or simply purchase a brewing kit – here are our recommended kits.
Ingredients
 How do you brew an Amber Ale? Here are the ingredients you will need in making your own beer.
- A jar of Steinbart Light LME (Briess Brewers Gold Malt Extract) (7 pounds)
- A bag of Norther Brewer Hops (1 ounce)
- A packed of Fuggle Hops (1 ounce)
- A bag of crushed, vacuum-sealed grain (2 ounces Chocolate Malt and 1 pound of Crystal Malt 60L)
- 1 tablet Whirfloc for getting rid of the sediments
- US-05 Ale Yeast (one package)
- 4 Hop Steeping Bags
Brew Your Own Beer Using these 14 Steps (Extract Method)
We often get asked, “How long does it take to brew homemade beer?” Thing is, there are so many variables involved that it’s not possible to give 1 definitive answer that will be accurate for everyone.
That said, if you have all the necessary equipment (including a wort chiller which is a non-essential but sure is a handy time saver), it can take about 3 hours to brew at home.
Now that that’s settled let’s go through the brewing process. Remember we’re using the extract method and that assumes you’ve purchased a brew kit.
Step 1. Cleaning and Sanitizing
 The first and most important step on how to make homemade beer is to clean everything thoroughly. We can’t emphasize this step enough. Proper sanitation is essential for getting a quality brew with no off-flavors or odd colors. Do this, and everything that follows should go smoothly.
There are plenty of cleaning solutions available on the market, but the one that we always recommend is Star Sans. A highly-effective sanitizer that is ideally for home brewing,
Star Sans foams up and reaches into the seams and crevices in your system. This ensures that all contaminants are totally eliminated, resulting in a good quality beer.
Step 2. Heat the Water
 The next thing you have to do is to bring the water in your brewing kettle to about 170 degrees over your burner of choice – here are some of our favorite homebrew burners.
If you’re only making a small batch, this won’t take long. We recommend always making at least 5 gallons, just to make the process worthwhile.
Step 3. Steep the Grains
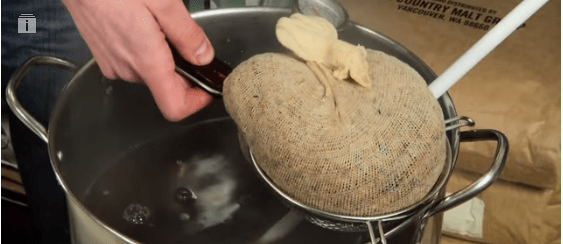 Fill a muslin bag with the grains from your kit. Tie off the top and steep it like a teabag in your hot water for about half an hour, stirring occasionally.
Then remove it and rinse it with clean, warm water over the kettle to extract the final bits of flavor for your DIY beer.
Step 4. Add the Malt Extract
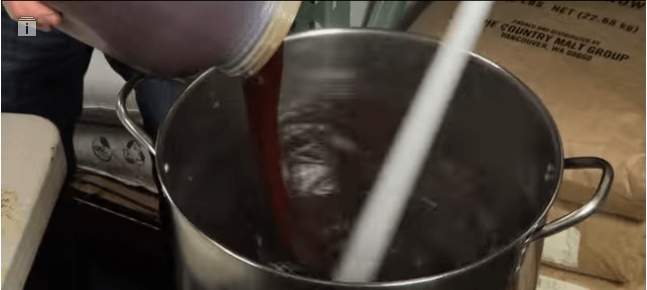 Next, we add the malt extract.
This will be pre-portioned and have the consistency of molasses so be patient and make sure you get it all.
In fact, rinse the tub with warm water to make sure you get the last of it and add it to the brew.
Step 5. Bring the Kettle to a Boil
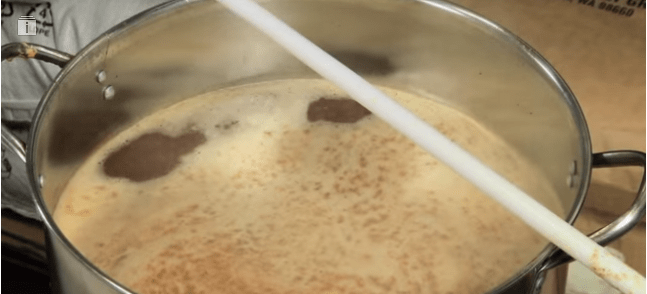 Your water/extract mix is now officially “wort,” or unfermented homemade beer.
Spark up the stove now and bring your wort to a boil. Not an insane, bubbling over the top boil, but a nice slow, gentle boil. Like chicken soup.
Step 6. Add the Hops and Whirlfloc Tablet
 Take your hops and place them in a muslin bag in the grains. Tie it off and suspend the bag in the boiling wort for about 90 minutes.
The purpose of the hops is to counteract the sweetness of malt.
About 15 minutes after suspending the bag of hops, add a Whirlfloc tablet to sanitize the beer.
Why 90 minutes? Boiling the hops for this long will effectively get rid of approximately 80% of the DMS (Dimethyl Sulfide) content. DMS is a sulfur compound that is a by-product of the fermentation process. The smell of cooked or creamed corn indicates the presence of DMS in your brew. [1]
It is also important to keep the lid off the brew pot while boiling the hops.
Covering the brew pot prevents the DMS from escaping, and it will simply end up back in your beer.
Step 7. Chill the Wort
 After about 90 minutes of boiling it’s time to turn off the burner and let the wort cool. You can either let it cool on its own (which will likely take a couple of hours) or use a wort chiller.
We didn’t include the wort chiller in our list of essentials because it’s a luxury. But it’s a luxury that will save you a lot of time. So if you can afford it, go for it.
We’ve found that using a wort chiller is by far the most effective way to cool down the wort. Plate or counterflow wort chillers tend to be more effective than copper immersion coil chillers, particularly with regard to removing DMS. We also recommend using a thermometer to ensure that the wort is cooled down to the right temperature.
It is also important to cool down the wort as quickly as possible in order to remove DMS effectively. The wort will continue to produce DMS even as it is cooling down, so getting it down to the right temperature is crucial. Furthermore, you can’t boil off any DMS that is produced while the wort is cooling. Keeping your wort hot results in as much as a 30% increase in DMS levels per hour, so get those temperatures down quickly!
Beer Pumps (optional): In order to speed up the cooling process even more, you might want to use a beer or chugger pump. In a pinch, you can even use a simple aquarium pump that you can get in any pet supply store. This will help circulate the wort more effectively, resulting in faster cooling times.
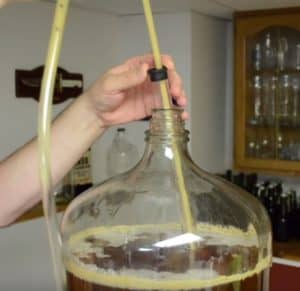
Step 8. Transfer the Wort
 The next step is transferring the cooled wort to the fermenter. Your fermenter should always be slightly bigger than the batch size.
This gives the beer plenty of room to ferment and foam without creating so much internal pressure that the fermenter is compromised.
We don’t advise pouring the wort as you see in the video unless you have a lot of experience. Use the siphon instead.
Step 9. Determine Your Initial Gravity
 At this point, you will want to measure the specific gravity of your wort. This is essentially the density of the wort in relation to the water. You will know how the fermentation process is moving along by the amount of sugar present in the brew. When you see that the sugar content is decreasing, you know that the fermentation is well under way.
Measuring the specific gravity will also let you know the Alcohol by Volume (ABV) level, which is how much alcohol your beer will potentially contain. During fermentation, the sugars are converted into alcohol. You can therefore determine how much of the sugar is being converted into alcohol by how much the specific gravity decreases daily. [3]
For measuring specific gravity, you could either use a hydrometer or a refractometer.
Hydrometers work by displacing liquid based on its density, and measuring how much of the liquid is displaced – Learn all about it here: how to use a hydrometer.
Refractometers, for their part, measure light refraction through the liquid. The measurement is then used to determine the amount of sugar present – .
Hydrometers are the simplest and least expensive tools for measuring specific gravity. Although they are easy enough for even beginners to use, they will continue to be useful even as you gain more experience with home brewing.
Step 10. Activating and Pitch the Yeast
 The next step is to “pitch” yeast into the wort. “Pitching yeast” is simply brewers’ terms for adding yeast to the wort, which kicks off the fermentation process in earnest.
Why is yeast added to the wort?
Remember that the wort contains considerable amounts of sugar. When yeast is added to solutions with adequate amounts of sugar in it, the sugar is used as fuel to create even more yeast. This is what produces the alcohol in beer.
Depending on the type of yeast used, pitching yeast will also imbue the beer with different flavors and aromas.
Before you pitch your yeast, you will have to activate it first. How you do so will depend on the type of yeast that you use. For home brewing purposes, there are essentially two kinds of yeast:
- Dry yeast – Commonly included in brewing kits, this does not require activation. However, you should ensure that it is at room temperature prior to pitching. Otherwise, it will die when it is added to the wort.
- Liquid yeast – This DOES require activation, which is done by shaking the container vigorously. You could even make a yeast starter, which primes the yeast for fermentation by allowing it to multiply.
Yeast starters serve a number of purposes:
- Increases the amount of yeast available for the fermentation process
- Rehydrates yeast
- Checks the viability of yeast
Check this homebrewing guide for detailed instructions on how to make your own yeast starter.
In most cases, you could probably use the yeast that came with your malt kit. This will probably be freeze-dried ale yeast, which works fine for brewing.
Step 11. Ferment the Beer
 Place the airlock on top of the fermenter and then let the whole thing sit for about 2 weeks. During this time the beer will ferment and the airlock will allow CO2 from the fermenting process to escape without letting air or bacteria seep in.
When brewing beer at home, a normal, steady temperature in the room where the ferment is located is crucial. Temperature swings can screw up the process.
Secondary Fermenters (Optional) – At this point, you might want to consider secondary fermentation. This simply involves transferring it from the first fermentation vessel into another container. Secondary fermenters are typically made of glass. Beer is left here to age for a period of two days to several months. There are a number of advantages–and disadvantages as well:
Pros
- The added method will result in a clearer and better-looking beer, with fewer sediments accumulating at the bottom of the bottle.
- It also helps you avoid having your brew sit in the primary fermentation vessel, which is likely made of plastic and probably isn’t airtight. Left in the primary fermentation vessel, beer will be affected by the oxygen seeping through the lid. This can have a detrimental effect on the flavor, as the primary fermentation process slows down and less protective carbon dioxide is produced.
Cons
- It adds another stage wherein contaminants and/or oxygen can be introduced into the beer. This can lead to off-flavors or even stale-tasting brew. This can be avoided by ensuring cleanliness and sanitation, but that will obviously add more work to the process.

You also don’t want your beer sitting in the primary fermentation vessel for too long, due to the yeast that invariably accumulates at the bottom. As the sugar in the wort is depleted, the remaining yeast will utilize dead yeast cells as an alternative food source.
This will cause them to go into a process known as “autolysis”, which again results in off-flavors rather than the carbon dioxide and ethanol necessary for the beer making process.
Not all beers require secondary fermentation. If you don’t plan on lagering beer or storing it for extended periods, you can pretty much leave it in the primary fermentation vessel until you are ready to bottle.
If you don’t want to deal with the effects of having your brew sit in yeast sediments for a long period of time, you can purchase brewing fermenters that are designed to contain the yeast in a small area at the bottom of the vessel. This facilitates the removal of the yeast, so you can keep your beer clean and fresh-tasting. Dive deeper into the world of professional beer judging and tasting in the Beer Tasting Mastery course here.
Step 12. Take Final Gravity Reading
 You will want to measure the specific gravity of your brew one more time at this point. This will enable you to determine how much sugar is left after fermentation ceases. This, in turn, lets you know its alcohol content.
Good Beer that has a low final gravity tends to have a dry or crisp flavor. In contrast, the product with high final gravity tends to have a sweet or malty flavor.
Step 13. Carbonate your Beer
 After the 2-week fermentation method is complete, you have real beer, although not “beer“ as most modern drinkers understand it.
To produce that, you’ll need to carbonate your beer. And to do that you’ll need to add carbonating sugars and let it sit for another week. (There are more complex ways of carbonation, but this will do for small batches.)
Carbonating sugars are created by mixing 3 or 4 ounces of corn sugar with 1 or 2 cups of water. Mix it thoroughly and pour it into the (now clean) 5-gallon kettle we used earlier. Siphon the beer from the fermenter into the kettle and mix it with the corn sugars.
Step 14. Bottling or Kegging (The Final Step!)

Once your beer has fermented for however long your recipe calls for, it is time to keg or rack lagering vessel like a chilled keg.
Racking essentially involves transferring beer from a fermentation vessel into another vessel, while limiting its exposure to oxygen. This will condition the brew and enable the formation of carbon dioxide bubbles, making it more similar to commercially-available beer.
There are two options for racking beer:
- Kegging
- Bottling.
Each of these has its own benefits and drawbacks, and your choice largely depends on your desired outcome.
Kegging
 Kegging is a convenient way to store beer for easy dispensing. Although it does take some time and the equipment is a bit costly, you get a clearer brew that can be carbonated quickly as needed.
Pros:
- Less chance of disturbing the yeast at the bottom of the keg
- Less time-consuming than filling up bottles
- Lets you adjust carbonation levels more precisely
- Kegs can handle over-carbonated beer better than bottles
Cons:
- A keg set-up costs more than bottles
- Requires a large refrigerator or cooler
Here are the steps to kegging your beer:
Step 1 – Sanitize the Keg
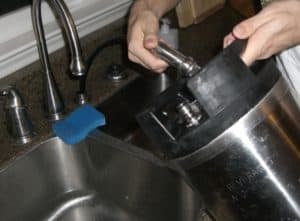 You will first have to sanitize your keg before you can transfer the beer into it. There are many commercially-available sanitizing solutions to choose from, most of which can do a great job of sanitizing your keg. You will want to get a no-rinse sanitizer since it will make it that much easier to prepare your keg for use.
Follow the instructions for mixing the keg cleaning solution and fill up your keg with it. Wait ten minutes and then turn the keg upside down. Let the keg sit for another ten minutes as the sanitizer goes to work.
You will be using carbon dioxide later on for carbonating your beer, but for now, you will be using it to force the sanitizer out of the keg. You will need to connect a length of tube to the “liquid” connector of your keg, with the other end leading to a large vessel. This vessel will hold the sanitizing solution you will expel from the keg.
Next, connect the CO2 tank to the gas connector of the keg and set the regulator to about 5 psi. This should force the sanitizer out of the keg into the collection vessel. Keep the CO2 going until no more liquid comes out and you only hear the hiss of the gas.
Step 2 – Rack the Beer
 The next step is to rack the beer, which simply means transferring it from the fermentation vessel into the keg. At this point, the keg is still filled with the CO2 from the previous step. Simply pull on the pressure relief valve until the internal pressure is equal to the pressure outside.
Take your racking tube and connect one end of it to the keg’s “liquid” connector. Attach another tube to the gas connector and place the other end into the sanitizer in the collection vessel.
You can then begin transferring the beer into the keg. As the keg fills up, the CO2 will then be forced out and bubble through the sanitizer solution. The keg will then be full of uncarbonated beer.
Step 3 – Carbonate the Beer
 Now, you can begin to carbonate your brew. Connect the CO2 tank to your keg again, and let the gas flow into the keg. Carbonation levels are measured in volumes, with most beers having 1.5 to 2.7 volumes of CO2. When in doubt, a volume of 2.0 is generally considered a safe carbonation range.
As you can see, CO2 is handy to have around when brewing at home. If you are serious about brewing your own beer, it might be worthwhile to purchase a keg charger such as The Brewer’s Corner’s Co2 Keg Charger or the Monster Brew Portable Cornelius Charging Kit.
While you’re at it, you might also want to check out the Home Brew Stuff’s 5-Gallon Keg Ball Lock Connections Single Handle keg.
Bottling
 As an alternative to kegging, you could opt to bottle your beer instead. It will take more time and effort than kegging, but it is a much less costly option. Besides, you simply can’t beat popping the cap off a bottle of your own special homebrew!
Pros:
- Inexpensive compared to kegging
- Requires much less equipment than kegging
- Bottles are easier to store and transport
Cons:
- Beer can be cloudy with plenty of sediments
- Time-consuming
- More complicated carbonation process
- Risk of breakage due to over-carbonation
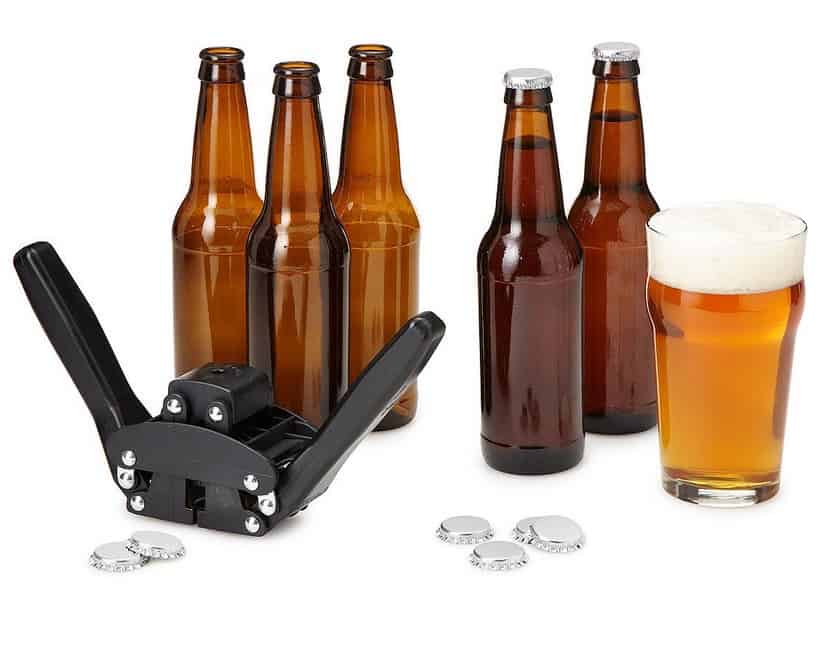
Here are the steps for bottling your beer.
You will need the following equipment:
- Bottle filler (Our recommended bottle fillers)
- Bottling bucket
- Siphon hose
- Bottle capper
Step 1 – Prepare your Sugar Solution
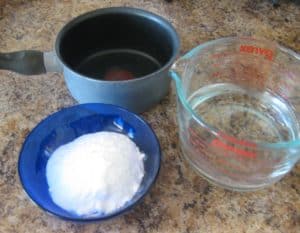 Mix ¾ cup priming sugar or 1-¼ cup dry malt extract in 2 cups of water and boil for 5 minutes. Let the solution cool, and then pour it into your bucket.
Siphon the beer from the fermenter, making sure that no sediments are sucked up along. Also, make sure to place the end of the siphon hose right at the bottom of the bucket. This will mix the beer more evenly with the sugar water, resulting in more effective carbonation.
Step 2 – Fill your Bottles
 If you are using a bottling bucket, first connect the siphon hose to the faucet. Connect the bottle filler to the hose’s other end. Insert the bottle filler into the mouth of the bottle, opening the spigot and pressing the bottle filler against the bottle’s bottom. This will start the beer flowing.
Fill your beer bottles about an inch from the top. Cap your bottles and set them aside to rest for 2 to 3 weeks. Keep them at room temperature during the entire time, so that they will carbonate properly and beer can be chilled and consumed as you wish!
Instead of priming sugar, you could also use dried material extract (DME) to induce carbonation. Make sure to follow instructions closely though so that you don’t inadvertently over-carbonate and cause bottles to explode!
Here is a summary video of the entire home beer-making process.
Extra Tips on How to Make Beer at Home

Secondary Fermenters
Earlier on, we mentioned the option to have your brew undergo a secondary fermentation process. This is a method of storing beer for extended periods and suited for lagering.
Secondary fermentation will help you remove the “trub”, which is a byproduct of the brewing process that may cause your drink to take on off-flavors.
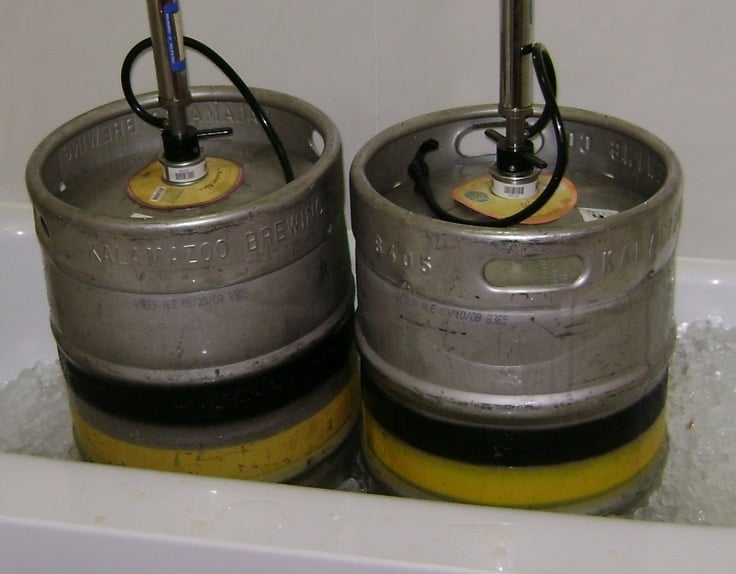
Lagering in a kegerator or keg
For lagering purposes, you will want to rack your beer into a kegerator (our recommended kegerators), or a temperature-controlled lagering keg, such as a Cornelius keg. Many experienced brewers based on other guides opt to cut the dip tube in the keg in order to prevent the remaining yeast and trub from ending up in the serving keg.
At this stage, it is important to ensure that your beer remains at the lowest temperature that the yeast can still ferment at. For this reason, you will want to age your brew in a keg that will fit into your refrigerator.
Aging your beer in a keg provides the following benefits:
- You can use the same keg for fermenting AND serving your beer
- It is a cost-effective solution
- Stainless steel construction makes kegs durable and easy to clean
- You can carbonate Beer easily and safely
- Easy dispensing
- Keeps out light which can kill yeast
- Easy to carry
- You can store in a fridge
Wait for a Week and Enjoy!
Carbonation will take about a week. Once it’s complete, you’re ready to enjoy your master brew so pop one open and have at it.
Make notes about what you like and don’t like regarding the finished product so you can tweak things next time you want to make your own beer.
Other things you can try next time on how to homebrew could be adding fruit to your brew or trying different types of hops.
Brew Your Own Beer Now!
Brewing good beer can be an incredibly satisfying experience. Just don’t expect to win any awards with your first batch.. or even your second. Like anything else that’s worth doing, it’s going to take time to master the process of making beer at home, but with patience, the right ingredients, the right equipment and some practice you will.
Once you do, you can expect your friends to start showing up at your door a lot more frequently than they do now.
If you want to get more tips on how to brew the perfect batch of beer, check out this simple guide on home brewing: Beer Brewing Made Easy. You’ll surely find something for you here whether you’re a complete beginner or a homebrew expert.
With this, you’ll learn more methods of home brewing, get access to different beer recipes, improve your skills to the point where you can finally maybe start a beer brewing business, and even start making wine and spirits in addition to your brew. How cool is that?
And by the way – if you’re too lazy to brew your own beer, join a beer of a month club in which you get award-winning, hard-to-find unique beers shipped right to your door. It’s a great way to expand your beer knowledge, your palate, and to perfect your craft as a brewer too.

The post How to Brew Beer at Home – A Complete Guide for Beginners & Homebrew Enthusiasts appeared first on .