Fluffy, fragrant, homemade Hot Cross Buns recipe! With my quick video recipe and some cheeky but effective tips, you’ll see that there’s no reason to be afraid of baking with yeast!
Plus, a bonus no-knead version – the world’s easiest hot cross buns recipe!
Hot Cross Buns
Big, fluffy, fragrant Hot Cross Buns just like what you get from your favourite bakery are easier to make than you think. Especially if you have a stand mixer. Homemade Hot Cross Buns become a dump-and-mix job to make the dough. Definitely my preferred method!
These Hot Cross Buns are way better than the stock standard ones you buy from grocery stores. Those are pumped with preservatives and have a distinct artificial flavour about them. Once you’ve tried homemade, you will never go back. I haven’t!
What you need for Hot Cross Buns
Here’s what goes into homemade Hot Cross Buns. You can make this recipe with any type of yeast – rapid rise, instant, active dry or even fresh yeast. Directions have been provided for all.
In this Hot Cross Buns recipe, I’m going to give you three different ways to make the dough:
- stand mixer – easiest, my default way;
- kneading by hand – takes 10 minutes, and requires decent arm strength; or
- simple no knead version – all you need is a bowl, wooden spoon and 1 minute of easy stirring. The easiest method of all, this will make buns that are ever so slightly less fluffy and do not keep quite as well. But it is a small compromise for the effort you will save!
How to make Hot Cross Buns
PART 1 – THE DOUGH
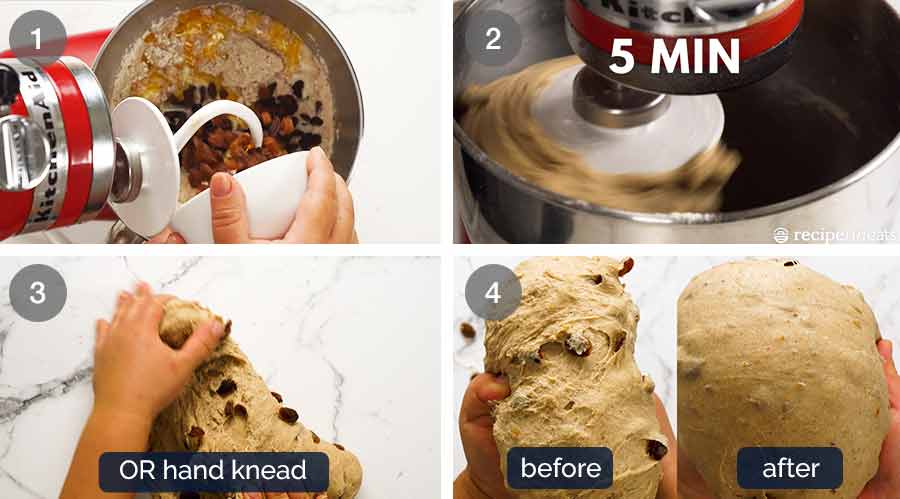
This is an easy method where you simple put all the dough ingredients in a bowl, then mix on speed 2 for 5 minutes OR knead by hand for about 10 minutes.
Your dough is ready when it is smooth and elastic – see #4 below for a Before and After Kneading comparison.
PART 2 – RISE
Once the dough is smooth, place it in a bowl, cover with cling wrap* then leave it in a warm place until it doubles in size. My no-fail place is the dryer! Run it (empty) for 3 minutes, then turn it off and put the bowl inside. Warm and wind free – perfect dough rising conditions!
* I know cling wrap isn’t an environmentally option, but it really is the most effective. Wet towel gets cold which can compromise the dough rising, a plate or pot lid doesn’t seal enough to trap warmth and humidity.
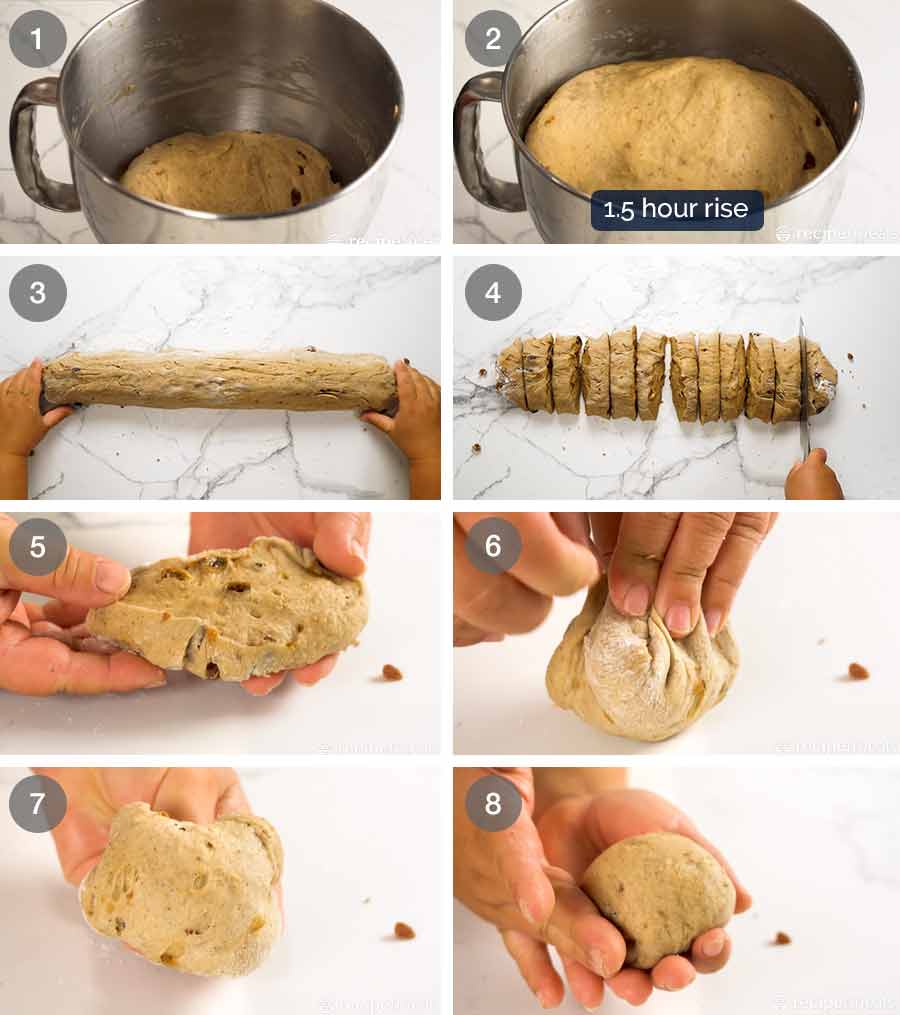
PART 3 – FORM BALLS
To form the balls that bake into smooth round Hot Cross Buns, I find the best method is as follows:
- Shape dough into log, cut into 12 pieces;
- Take a piece, then bundle it up like a moneybag – this will stretch one side into a smooth round dome; and
- roll/press/shape into a neat ball, the place the ball into the baking pan smooth side up.
PART 4 – Rise #2
Spray cling wrap with oil, then loosely drape over the buns. Leave for 40 minutes until they almost double in size – about 75% is enough.
PART 6 – BAKE!
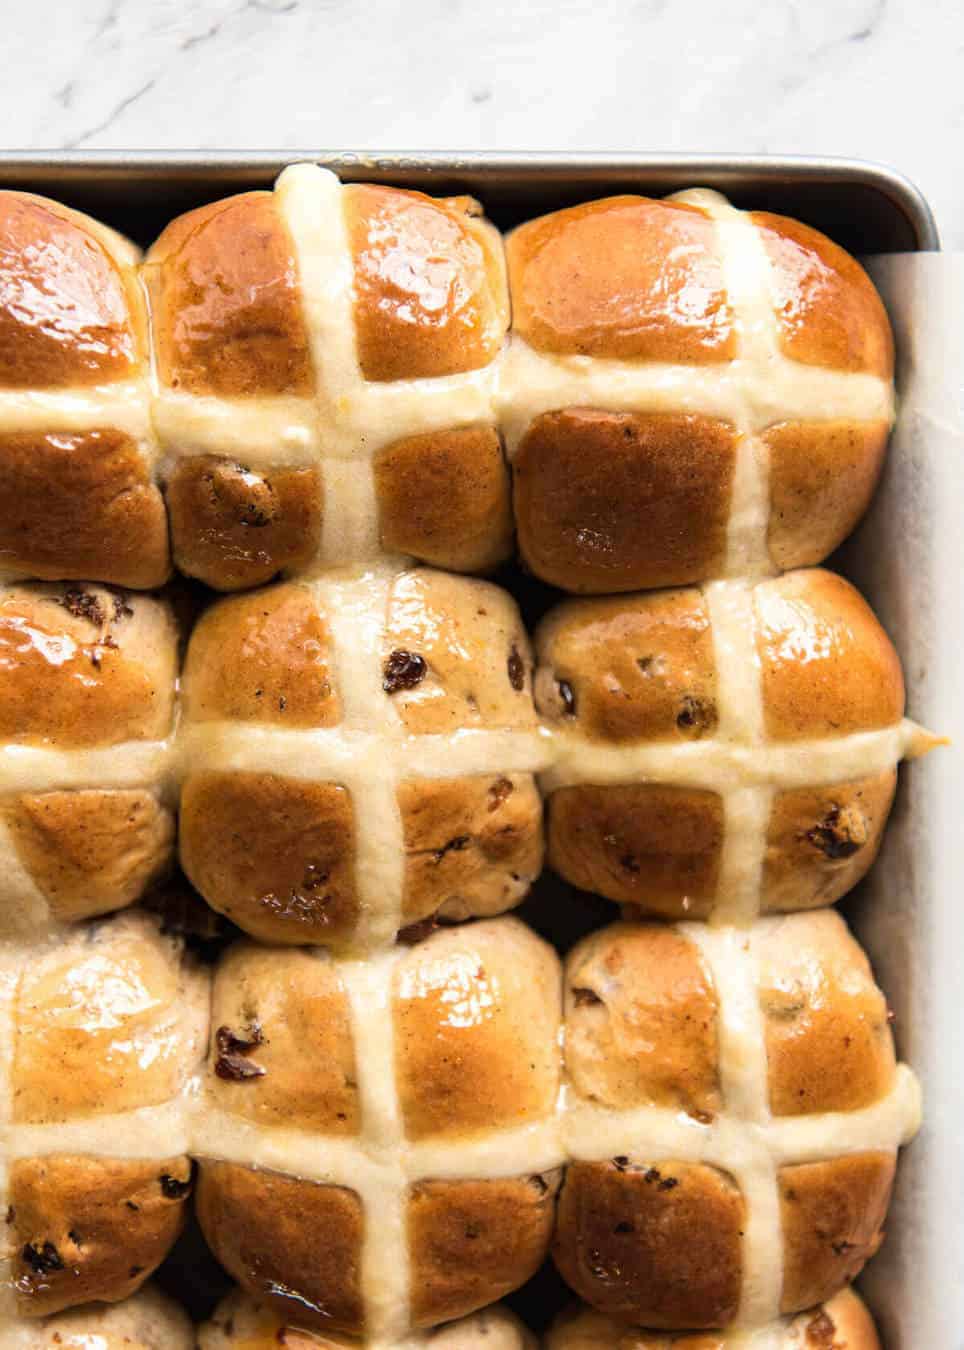
Bake for 22 minutes or until the buns are a deep golden brown. I find that colour is the best indicator for this recipe. Pale = undercooked. Burnt = 😩
PART 7 – GLOSS!
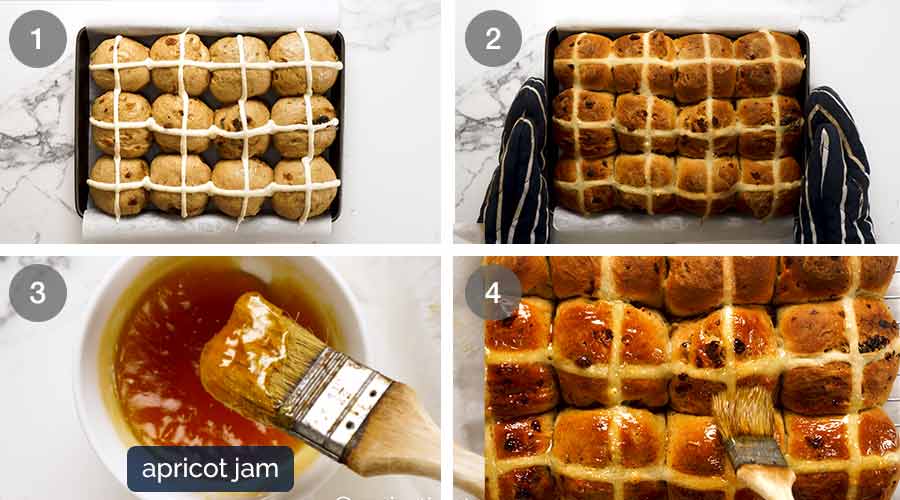
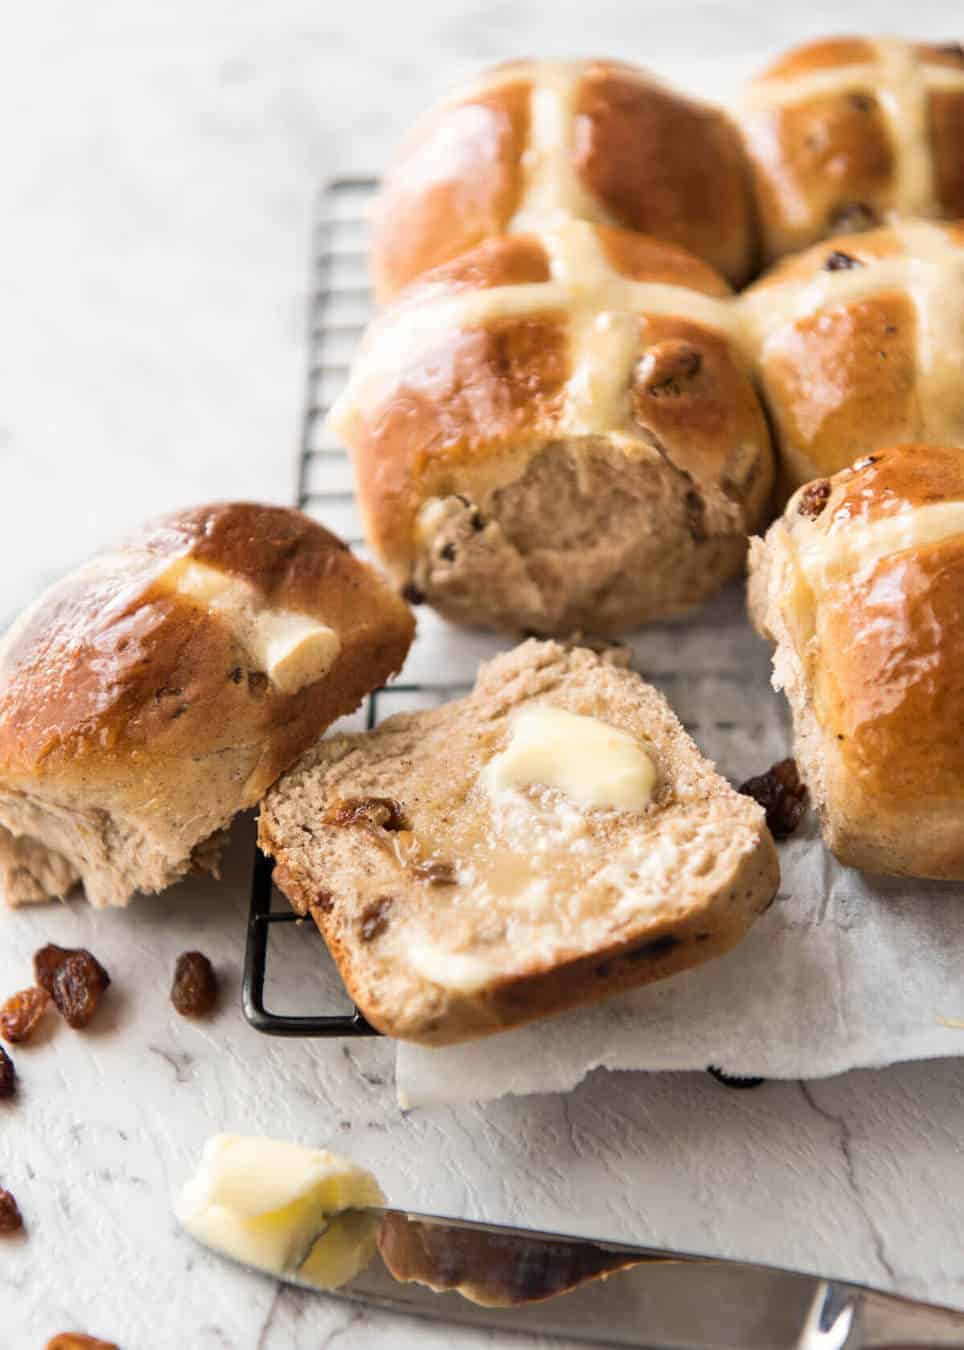
The lovely shiny finish on Hot Cross Buns is simply a mix of heated apricot jam and a touch of water. Just microwave to heat, mix until smooth then lightly brush onto the surface.
No Knead Hot Cross Buns
No Knead Hot Cross Buns are exactly as the name says – Hot Cross Buns that are made without kneading the dough. The dough mixture is looser, almost like a thick muffin batter, that you mix with a wooden spoon, then leave it to rise and proceed with the same steps as above.
The end result is marginally different to the kneaded version. The buns rise a touch less, and they do not keep as well – they are a bit drier the next day.
I say that do not rise quite as much, but they’re still super soft and fluffy. See?
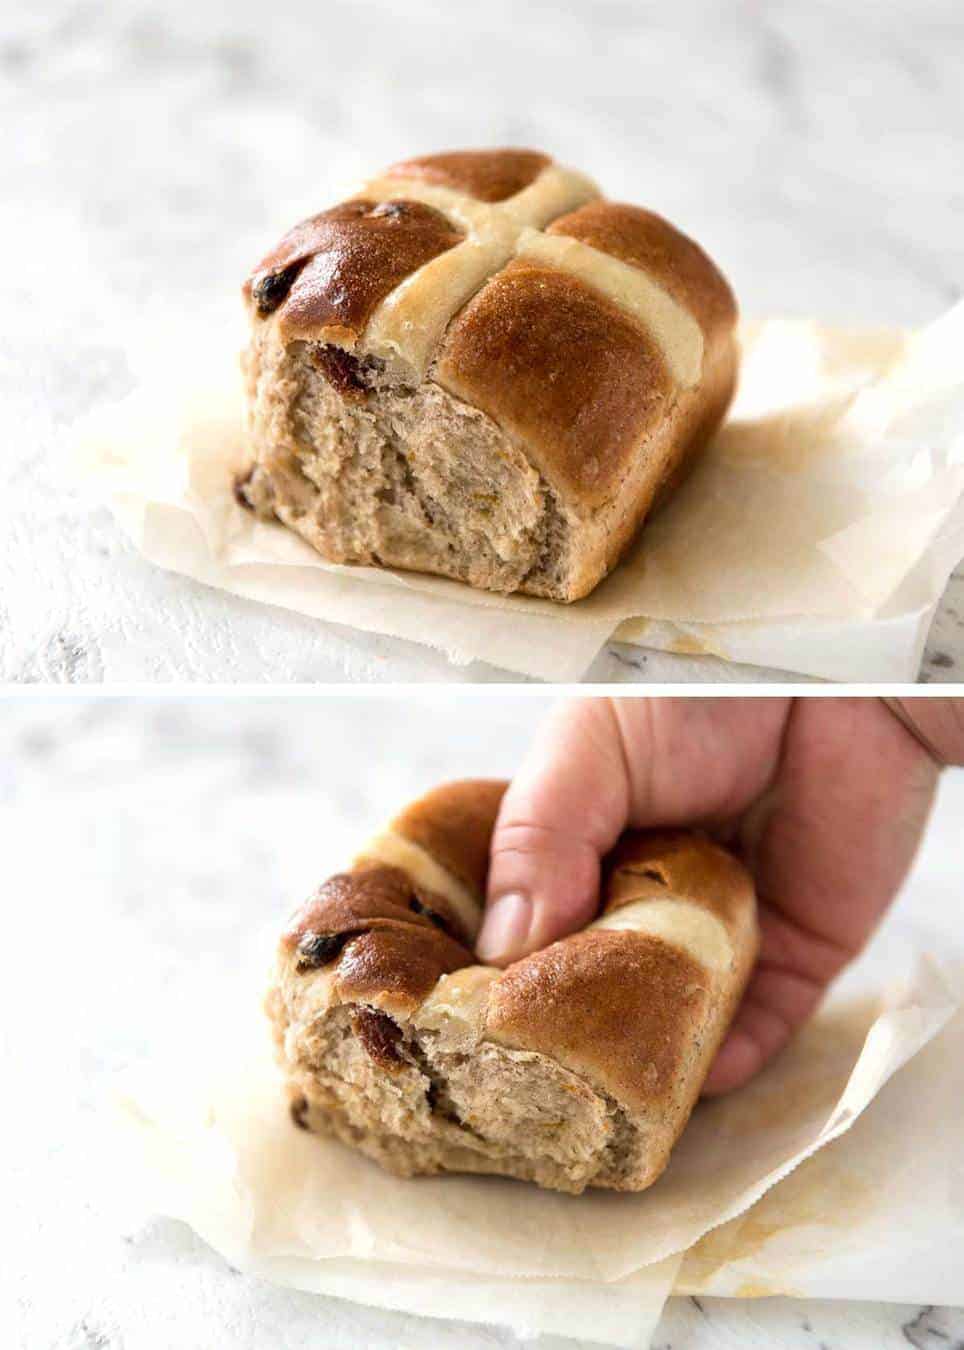
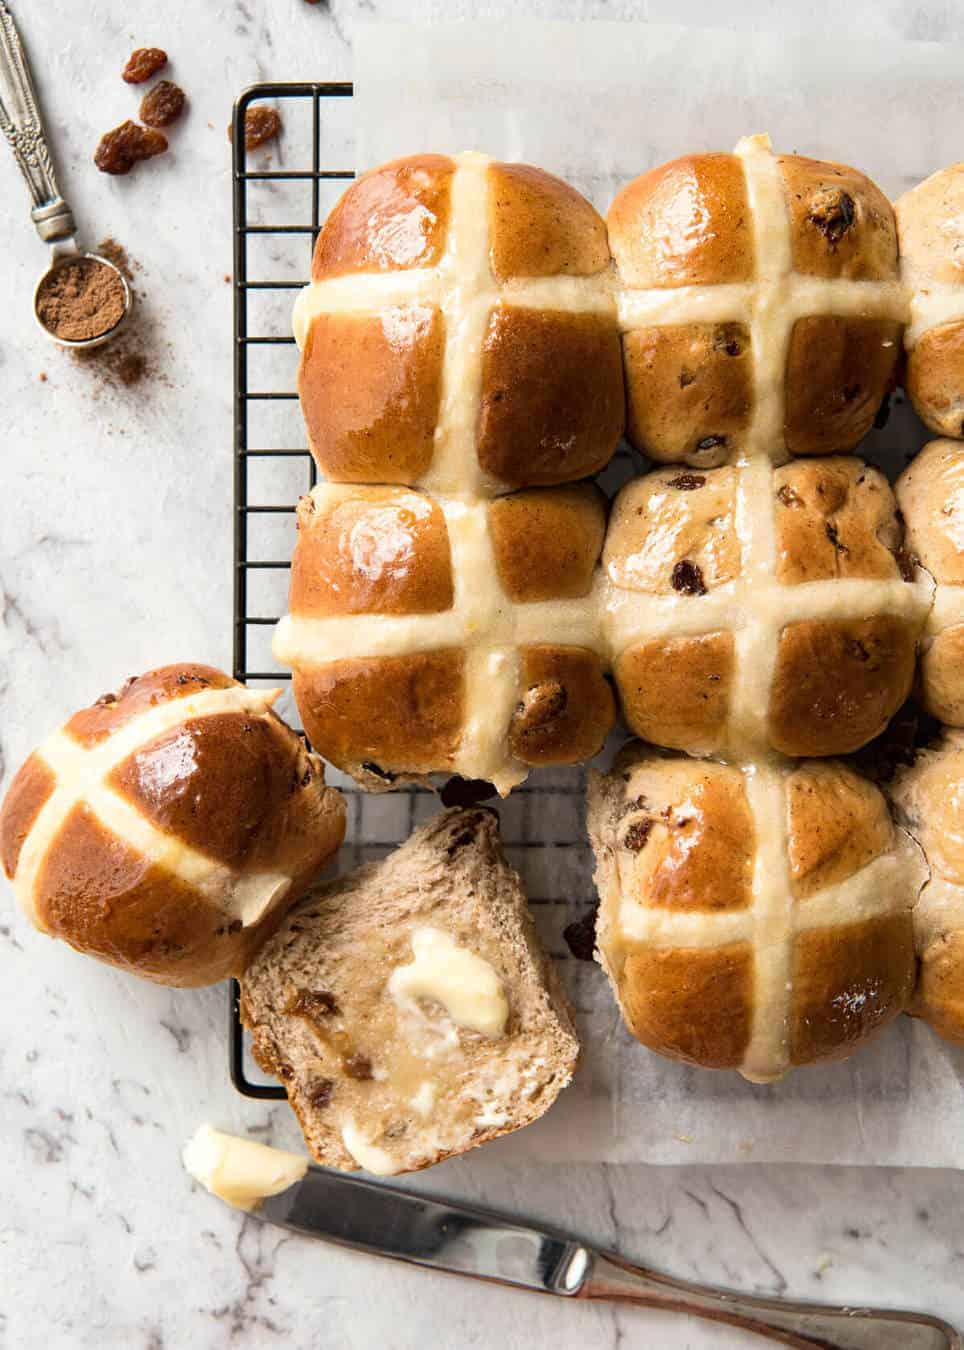
There are very few things in this world that can rival the smell of freshly baked homemade Hot Cross Buns, fresh out of the oven.
It’s a smell we only get to enjoy once a year, around Easter. So let’s make the most of it! – Nagi xx
Watch how to make it
Hot Cross Buns recipe video! NOTE: This is for the classic kneaded Hot Cross Buns, not the No Knead version. For the No Knead Hot Cross buns, see recipe intro for links to relevant video.
Hot Cross Buns recipe

Recipe video above. Fluffy, perfectly spiced homemade Hot Cross Buns! Especially to see the dough before and after kneading, and how I roll the balls to get nice smooth golden tops. Also, see below for the NO KNEAD version of this recipe! Inactive time for this recipe: 1 – 2 hours.
Buns:
- 1 tablespoon instant or rapid rise yeast ((Note 1 for active / normal yeast))
- 1/2 cup (110g) caster sugar (superfine sugar)
- 1 1/2 cups (375ml) milk (, whole or low fat, warm (Note 2))
- 4 1/4 cups (640g) bread flour + 1/4 cup Extra ((or normal plain flour / all purpose flour) (Note 3))
- 2 tsp cinnamon powder
- 2 tsp All Spice
- 1/2 tsp salt
- 1 1/2 cups (210g) sultanas ((Note 4))
- 1 – 2 oranges, zest only ((Note 4))
- 50g / 3.5 tbsp unsalted butter, melted and cooled
- 1 egg (, at room temperature)
Crosses:
- 1/2 cup flour ((any white flour))
- 5 tbsp water
Glaze:
- 1 tbsp apricot jam
- 2 tsp water
-
Place flour, yeast, sugar, all spice, cinnamon, and salt in a large bowl. Briefly mix with stand mixer fitted with a dough hook.
-
Add butter, milk, egg, sultanas and zest.
-
Mix until a smooth elastic dough forms – 5 minutes on Speed 2 of standmixer. Add extra flour if required. (Note 5). Dough should be smooth and not break when stretched – see photos and in post for before/after kneading comparison.
-
Alternatively, dust a work surface with flour and knead by hand for 10 minutes.
Rise #1:
-
Leave dough in the bowl, cover with cling wrap and place in a warm, wind free place to rise until doubled in size. This will take anywhere between 30 minutes to 1 1/2 hours depending on how warm it is – see Note 6.
Forming Balls (watch video, it's helpful):
- Line a 31.5 x 23.5 cm / 9 x 13″ tray with baking paper with overhang.
-
Remove cling wrap and punch dough to deflate.
-
Dust work surface with flour, place dough on work surface, shape into a log – this will deflate the air. Cut into 12 equal pieces.
- Take one piece and press down with palm, then use your fingers to gather into a ball, then roll the dough briefly to form a ball. This stretches the dough on one side and that’s how I get a nice smooth surface.
-
Place the ball with the smooth side up on the tray. Repeat with remaining dough. Line them up 3 x 4.
Rise # 2:
-
Spray a piece of cling wrap lightly with oil (any), then loosely place over the tray.
- Return tray to warm place and leaver 30 – 45 minutes, until the dough has risen by about 75% (less than double in size).
-
Partway through Rise #2, preheat oven to 180°C/350°F (all oven types).
Crosses:
-
Mix flour and water until a thick runny paste forms – see video for thickness required.
- Spoon into a round 3 mm piping bag or small ziplock bag then snip corner.
-
Remove the cling wrap and pipe crosses onto the buns. Go slow so it hugs the curves.
Baking/Glaze:
-
Bake for 22 minutes, or until the surface is a deep golden brown. The surface colour is the best test for this recipe.
- Meanwhile, place jam and water in a bowl, microwave for 30 seconds. Mix to combine.
-
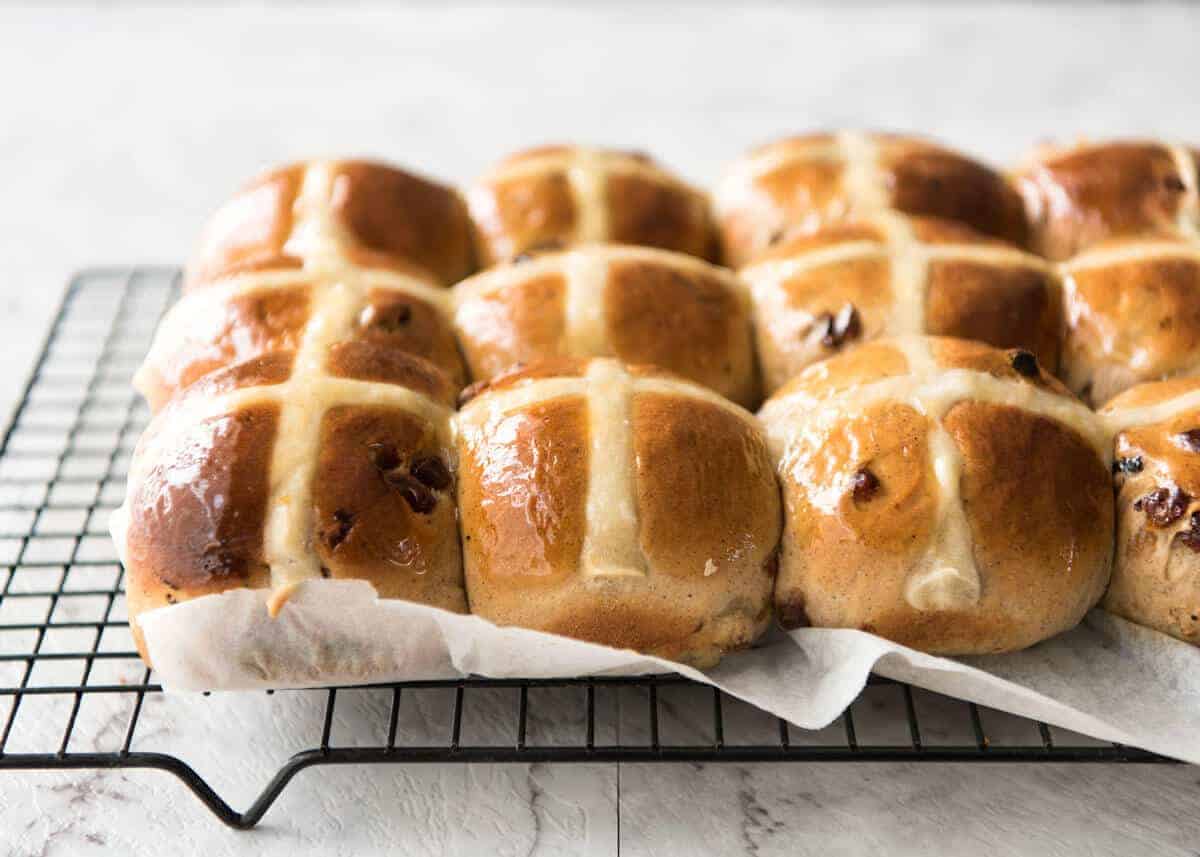
Remove buns from oven. Use overhang to lift buns onto a cooling rack.
-
Brush with jam mixture while warm. Allow to cool to warm before serving.
1. 1 tbsp dry yeast = 9 grams
I use Lowan Dried Instant Yeast (red tube, sold at Woolies/Coles baking aisle). Use any yeast labelled instant or rapid rise yeast.
Normal yeast / active dry yeast – same ingredients, but start as follows:
- mix yeast, 2 teaspoons of the sugar and yeast in the bowl, then leave 5 – 10 minutes until surface gets foamy;
- add all the other ingredients (including remaining sugar minus the 2 tsp used above), then mix/knead per recipe; and
- proceed with recipe as written.
Fresh yeast (comes in a block that crumbles, not powder like dry yeast) – use 27g/ 0.9 oz. Crumble it into the milk and let stand until it foams up, same as using active dry yeast per above.
2. Milk warmth – Scalding hot milk kills the yeast. I heat it for 45 seconds on high in the microwave. The test is this: stick your finger in. If it was a bath, would it be pleasant? Good. It’s not too hot or too cold!
3. Breads are also fluffier and more tender if made with bread flour rather than normal flour. However, this recipe works great with normal white flour too.
Flour quantity – differs all year round, and with different flour brands. Start with 4 1/4 cups to be safe (better to start sticky and add more flour as required), expect to add an extra 1/4 cup. DO NOT add too much flour – results in dry dough = tough buns.
4. SULTANAS: Some recipes say to add sultanas after the dough has been kneaded or risen. If you do this, you’ll find it very hard to disperse them evenly throughout the dough. By adding them before kneading, some do get squished. But it’s not noticeable in the end result.
Orange – use 2 oranges if you want a more prominent orange flavour, or switch for 1/2 cup candied citrus peel.
5. Dough: Takes ~5 min, speed 2 with KitchenAide. Add the extra flour if required so the dough comes away from the bowl – the trick is to use the minimum to keep the dough soft (= dough rises easily = fluffy buns), but just enough so the dough doesn’t massively stick to your fingers (should be bit sticky though). Tough dough from too much flour = tough buns!
6. WARM PLACE for dough: This is what I do all year round – use my dryer. Laugh – but try it! Run the (empty) dryer for 1 – 2 minutes, then place the bowl inside. If you do that, the dough will rise in 40 minutes. Even if it’s snowing outside!
7. STORING / MAKE AHEAD: As with all homemade bread, it is best served on the day it’s made. Stays fresher and softer if you use bread flour.
For the day after, reheating makes all the difference to make them soft and moist again – 15 sec in the microwave! These freeze great, then just defrost. To reheat batches, I pop them on a tray and cover with foil (to avoid the surface getting too crisp), then reheat at 160C/320F for 8 minutes or so.
NO KNEAD Hot Cross Buns

This no-knead version of Hot Cross Buns come out just like the classic version (see above), except the buns rise a little bit less, and the dough takes longer to rise. The dough has more ingredients (to make the end result as similar as possible) and the buns don't keep quite as well (Note 6). Watch the Kneaded Hot Cross Buns video above to see how to roll the dough into balls and pipe on the crosses. Watch the video in the Soft No Knead Dinner Rolls for the dough (uses the same base dough recipe!) 2.5 hours inactive time.
Buns:
- 1 tablespoon dry yeast – any type (active dry, rapid rise, instant) ((Note 1))
- 1/2 cup (110g) caster sugar (superfine sugar), or sub with normal white sugar
- 1/2cup (125 ml) warm water (Note 2)
- 1 cup (250 ml) milk, lukewarm, whole or low fat, (Note 2)
- 4 cups (600g) bread flour + extra for dusting (Note 3)
- 2 tsp cinnamon powder
- 2 tsp All Spice
- 1/2 tsp salt
- 1 – 2 oranges (, zest only (Note 4))
- 1 1/2 cups (210g) sultanas (Note 4)
- 50g/ 3.5 tbsp unsalted butter, melted and cooled
- 2 eggs, at room temperature, lightly beaten with fork
Crosses:
- 1/2 cup flour, any white flour
- 5 tbsp water
Glaze:
- 1 tbsp apricot jam
- 2 tsp water
- Place the yeast and 2 teaspoons of the sugar in a medium bowl, then pour in water. Leave for 5 minutes until it froths.
- Place flour, remaining sugar, salt and spices in a bowl. Whisk to combine.
- Make a well in the centre. Add remaining Buns ingredients and pour in the yeast liquid, including all froth.
-
Mix until combined with wooden spoon – it will be like a thick muffin batter. Not pourable, but thick and sticky.
Rise #1:
-
Leave dough in the bowl, cover with a wet (clean) tea towel and place in a warm place to rise for around 1 1/2 – 2 hours. See Note 5 for how I do this (you will laugh – but it works every time!). The dough will triple in size and be bubbly on the surface.
Forming Balls (watch video, it's helpful):
- Line a 31.5 x 23.5 cm / 9 x 13″ tray with baking paper with overhang.
- Remove tea towel and punch dough to deflate.
- Dust work surface with flour, place dough on work surface. Dust top of dough then knead lightly (to deflating air) and shape into a log. Cut into 12 equal pieces.
- Take one piece and press down with palm, then use your fingers to gather into a ball, then roll the dough briefly to form a ball. This stretches the dough on one side and that’s how I get a nice smooth surface.
-
Place the ball with the smooth side up on the tray. Repeat with remaining dough. Line them up 3 x 4.
Rise # 2:
- Spray a piece of cling wrap lightly with oil (any), then place over the tray.
- Return tray to warm place and leave for 45 min – 1 hour, until the dough has risen by about 75% (less than double in size).
- Partway through Rise #2, preheat oven to 180C/350F (all oven types).
Crosses:
- Mix flour and water until a runny paste forms – see video for thickness required.
- Spoon into a round 3 mm piping bag or small ziplock bag then snip corner.
-
Remove the cling wrap and pipe crosses onto the buns. Go slow so it hugs the curves.
Baking/Glaze:
-
Bake for 22 minutes, or until the surface is a deep golden brown. The surface colour is the best test for this recipe.
- Meanwhile, place jam and water in a bowl, microwave for 30 seconds. Mix to combine.
- Remove buns from oven. Brush with jam mixture while warm.
- Use overhang to lift buns onto a cooling rack. Allow to cool to warm before serving.
1. Yeast – 1 tbsp dry yeast = 9 grams
I use Lowan Dried Instant Yeast (red tube, sold at Woolies/Coles baking aisle) which technically doesn’t need to be frothed before using but there’s no harm in doing it, and I do it out of habit + also because then the same steps apply to any dried yeast. If you are using the packets, you can just use 2 x 7 g sachets, that is 4 1/2 tsp which is slightly more than 1 tablespoon but it works just fine. Doesn’t taste yeasty and makes it rise a touch more. Otherwise, measure out 1 tablespoon.
If your yeast doesn’t go frothy, sorry to say it’s not active so your buns won’t rise. 🙁
To use fresh yeast (comes in a block that crumbles, not powder like dry yeast), use 27g/ 0.9 oz. You don’t actually need to dissolve it in liquid like I do with the dry, but there’s no harm in doing it and so for the sake of consistency, crumble it in and let stand until it foams up, same as using dry yeast.
2. Milk – Scalding hot milk and hot water kills the yeast. I heat milk for 45 seconds on high in the microwave, and use warm tap water. The test is this: stick your finger in. If it was a bath, would it be pleasant? Good. It’s not too hot or too cold!
3. Flour – Breads are also fluffier and more tender if made with bread flour rather than normal flour. However, this recipe works great with normal white flour too.
4. Sultanas – Some recipes say to add sultanas after the dough has been kneaded or risen. If you do this, you’ll find it very hard to disperse them evenly throughout the dough. By adding them before kneading, some to get squished. But it’s not noticeable in the end result.
5. WARM PLACE for dough: This is what I do all year round – use my dryer. Laugh – but try it! Run the (empty) dryer for 1 – 2 minutes, then place the bowl inside. If you do that, the dough will rise in 1.5 hours. Even if it’s snowing outside!
6. STORING / MAKE AHEAD: As with all homemade bread, it is best served on the day it’s made. The No-Knead version doesn’t keep quite as well as the kneaded version – dries out more. For the day after, reheating makes all the difference to make them soft and moist again – 15 sec in the microwave! These freeze great, then just defrost. To reheat batches, I pop them on a tray and cover with foil (to avoid the surface getting too crisp), then reheat at 160C/320F for 8 minutes or so. Or cut in half and toast.
Originally published March 2017, updated April 2020 with a brand new video and new process steps.
Life of Dozer
He is damn lucky he’s so cute….. that’s a plate from Japan! I can’t just pop into Target to replace it!!

The post Hot Cross Buns Recipe appeared first on RecipeTin Eats.